Tuesday, 15 October 2013

The Pigeon Has Landed!!

When I saw that Cloud 9 was releasing a range of fabric from the book "Don't Let the Pigeon Drive The Bus", I knew I had to make it into a quilt. To say that Little Miss E loves that book is an understatement!! She knows all the words, and she cant even read!

When I ordered it, I was really excited, and whipped the quilt top up in record time. Then it sat in my cupboard.....for about 5 months!

I really didn't know how to quilt it. I haven't as yet quilted any quilt with my darning foot (free-motion), so I got it out, made a few 'quilt sandwiches' and had a practise! It was a lot more difficult than I though!


So I put that back into the 'too-hard' basket, and got out my handy-dandy walking foot! (I quilt EVERYTHING with my walking foot!) If you look in the picture above you can see that I have quilted it with pigeon feet! Little Miss E loves that that naughty pigeon walked all-over her quilt! At first I made the 'tracks' go in different directions, but after quilting about half, I stopped and had a far-away look at it. 
It was a MESS! So of course I got frustrated and jammed it put it back into my cupboard. 

Little Miss E then asked if I had finished it..... so I got it back out again. 
Mr Handsome told me that it would look better with the pigeon feet going in straight lines. He was so right! So I spent the rest of the night unpicking and re-quilting. 

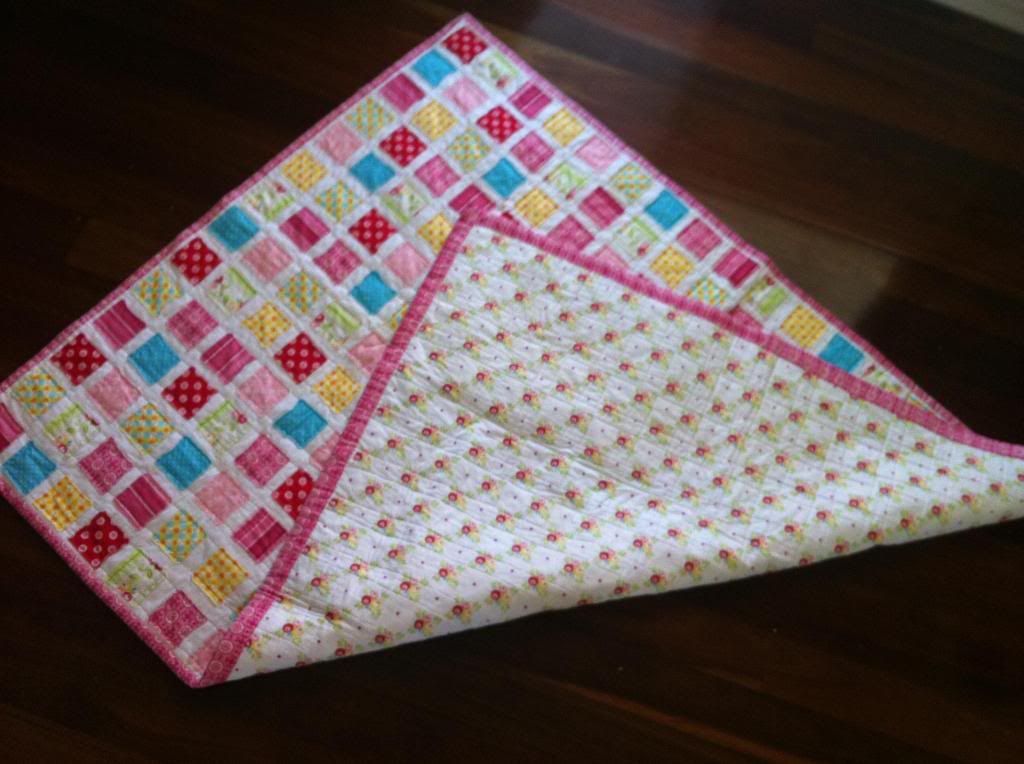
I used a stripy fabric from the range cut on the bias for the binding. This is the first time I have done bias binding, it wasn't as hard as I thought, and I really like the diagonal stripe.


 The back was the cheater print from the range. I really like how the back is just as fun as the front and that the quilt is reversible.


I also ordered the panel and used the cushion templates as an appliqué. I love how the pigeon is eyeing off the bus!


When I gave this quilt to Little Miss E she got out her book and started matching the pictures on the quilt with the book! So cute! I can see this quilt is going to be loved and cherished!


Then of course when Little Miss I saw her sister getting her photo taken, she had to have some of the action. 


I love this photo!

Jessica

Tuesday, 8 October 2013

Bringing back the Culottes!

 Is it a skirt?


Is it some shorts?


 NO! they are Culottes! (and very wrinkly ones too! Oops...forgot to iron!)

I have been really looking forward to using this pattern from Megan Nielsen ever since I got it! I decided to use this polka-dot fabric for a trial run, as I didn't want to cut into the lovely mustard-coloured fabric I have set aside for this! 
In saying that however, I LOVE the polka-dots, and will definitely wear this in the upcoming summer months! Its the perfect pair of culottes for the beach!

As I mentioned in a previous post, I love the nice little booklet that comes with this pattern, especially the variation ideas and the note taking page. However, what I didn't realise is that the pattern is printed on normal paper. I mean, like paper from your printer. I really don't like that!

It meant that I couldn't cut underneath the pattern to the size that I want, which is what I usually do. So I had to make a pattern out of baking paper! It was SOO AWFUL! 
Ha ha, it actually wasn't too bad, but it did take time and effort. 

 I was in between sizes, so I just traced in between the lines. Quite easy actually. I think I may have measured my waist incorrectly, (or I measured on a 'skinny day'..which is one in which I haven't stuffed myself with food) because the waist was a tiny bit tight. The pattern does say that it should be snug, and it was. It wasn't really bad, or cutting off circulation, and I could still bend and move with ease, but I may make my next version just a few centimetres bigger.

Because I'm tall, the crutch in these was a wee bit high (pardon the pun). If I was going to make another high-waited version, I would definitely lengthen that slightly. Again, it wasn't too bad, or even uncomfortable, but it could be more comfortable a little lower.

It was really easy to lengthen this pattern. In fact, it gives you directions on how to do it. The original pattern is way way too short for me. I lengthened this pattern by 6 1/2'' (you'll have to excuse my switching back and forth between imperial and metric), which was as long as I could make it with the amount of fabric I had. I really like this skirt, but its still verging on too short, so I'm thinking of adding some nice cotton lace trim to the hem. I love lace, and I'm of the opinion that it would enhance ANY item of clothing. You can never have too much!

Overall I'm super happy with these. They are comfortable (despite all my complaining) and flattering. One thing I have noticed is that the back hem is about 2'' longer than the front. If you look at the photo below on the left, you can really see it.


However depending on how I stand, sometimes it not noticeable (see the photo above on right). After a quick search through other blogs, it appears to be a common problem, and most people it seams (I'm on a roll with these puns!) have cut the back hem to be level with the front. However, as a pear shape, a bit of extra bum coverage never goes astray! So I am going to leave it as is.

Overall this pattern is a winner! Be warned however, if your planning on making these longer than the pattern, you will need a LOT of fabric. The legs just keep getting wider and wider as the pattern gets longer.


They're fun to twirl in too, and gives peace-of-mind that if there is a bit of wind about, that its not going to fly over your head. Although, you could definitely do a bit of flashing if your not careful as each 'leg' is really quite wide! Just so you know.

I just wanted to make a small mention of an online shop I found here in good ol' Oz. Its called Indie stitches, and the owner is oh-so-nice!


But the best thing about it is, they stock really nice patterns and have free shipping Australia wide! I know I'm always really jealous of the lucky Americans who can get free shipping for practically EVERYTHING, while I have to pay a small fortune. Just thought I'd share.

Well, the kiddies are in bed, and I'm off for a spot of sewing!

Jessica


Wednesday, 2 October 2013

Sew Bossy Round One!

Sew Bossy has come early!!


The lovely Mary from Style Me Mary contacted me to see if I wanted to pair up with her.
YES YES one thousand YES!
We decided to change things up a bit and do it with children's clothes! I'm gathering up a sweet little package for her cute daughter, and Mary is putting one together for Little Mr Z!

I found it really hard to shop for someone else! Especially someone I have never met before, but I love what I choose, so I'm hoping Mary will too.
I would love to give you a sneak peak of what I have got so far, but I want it to be a complete surprise for when it gets to New York.

I want to give her a small taste of Australia, so I'm just gathering the last few fun things to put in, then in the mail it will go!

I'm really looking forward to seeing what she has put together for me. I think I may possibly be getting the better end of the deal. Mary has told me all fabric shopping in New York! It sounds like a far cry from the limited supply of fabric shops here in my part of the world.

But I still like what I have chosen. I actually want to get the pattern for myself to make it for my girls!

So in a few weeks, come back to see the *Grand Opening* of our packages. Im so excited!!!

While your waiting you could check out Mary's blog here. (Just look at how adorable her daughter is!)

Jessica

(Just in case you were wondering, I am still planning on doing this with Anna as I posted about before. That will be coming at the end of the year.)

Monday, 30 September 2013

Vintage Baby Quilt

My Sister had her first baby back in February last year. So of course I wanted to make her a quilt. My sister back then was really into pastels and muted colours. So I decided to make her a bright quilt. (Being the eldest of 6 children, its my birth-right to know what my brothers and sisters need, and dish it out accordingly!)

After much searching I settled on this Vintage Baby Quilt pattern. Its really really cute. The squares are not pieced into the quilt, but are sewn on top, so the edges get a lovely vintage ruffled feel.


I ordered a kit from a fabric store on Etsy called Quilt Taffy. They were so helpful. They sent me numerous photos of different bundles of fabric so I could pick which ones I wanted. They also cut all the squares for me, which was awesome! The price was really good too! (which is always important)

I thought this quilt would go together quickly, but it was an effort!! Getting each square to sit straight on the fabric and then sewing it was hard.    


I made this quilt bigger than the pattern, as I want it to get lots and lots of use. (The quality of the photos aren't that great because this quilt is actually in Queensland, and I had to ask my sister to send me some photos of it.) 


I love the back of this quilt! Its hard to see, but its such a sweet print, especially for my gorgeous little niece! 

I will definitely use this pattern again! Such a simple design, but it looks so lovely. I have actually been dying to make a baby girl quilt, but boys seem to be the trend amongst all my friends lately!


My sister is actually having her second child in about 4 weeks, (yep, a boy) and I'm going to make her another quilt. Cant have my handsome little nephew using a pink quilt!


Toodles!

Jessica

Second Family Reunion Dress (Oliver + S)

As promised here is the second Oliver + S Family reunion dress. When I made Little Miss I's, Little Miss E wanted hers to be the same. Its funny, some days they want to be dressed exactly the same, and others, they don't want to be anything like each other! Ugh! Twins!

When I went to the fabric store to get the same fabric, I noticed that there was this lovely pink and orange fabric, with the silver threads running through it just like the last one. So I decided to get this instead. I'm glad I did as Little Miss I is slightly taller than her twin, so I lengthened her dress by an inch or two, whereas this one I made to the pattern. I want to be able to tell them apart.


I swear my girls are nothing like me. When ever the camera comes out, they are full off poses. Like this one below. One leg, and one arm in the air? Perfect pose according to my 4 year old!


I put 4 little pink buttons on the front of this one. I love the detail.


For the back I found these awesome orange buttons. They kind of remind me vintage-type buttons (I'm not going to try and guess the era). I almost remember seeing similar buttons on something my mum used to wear....


Lovely button up back. I don't know why, but I love this look :) I also love the pintucks on the front and back.


And here is a close up of the hem. I mentioned this in the last post but forgot to take a photo of it. It adds a nice detail, and a bit of weight as well. 


As usual Oliver + S patterns are great! Instructions are so clear, and the results are so professional. The patterns have mentioned 'French seams' a few times. I have no idea what they are. When I finish a seam, I just zig-zag the raw edge. A French seam sounds a little more classy though...I might have to do a quick google search and find out what it is!

Later Vader,

Jessica