Showing posts with label bags. Show all posts

Monday, 29 February 2016

Desmond Backpack: :

There's a new bag in-town. A handsome, stylish, and completely practical bag. His name is Desmond!

If you haven't seen Taylor Tailor's new backpack popping up allover the place, then head yourself on over to his site here.

As my dear husband has now started is university degree (mech engineering), he was in obvious need of a bag. A backpack to be precise.

So I hunted through online patterns to find the right bag for my man. And Voila! And new bag was born.


IMG_2072 

A thousand apologies for the off-focus photo. He was holding a squirmy Little Miss S, who was more than ready to go to bed, so it was hard to get a good shot of the bag (and of course I couldn't wait till she was asleep).

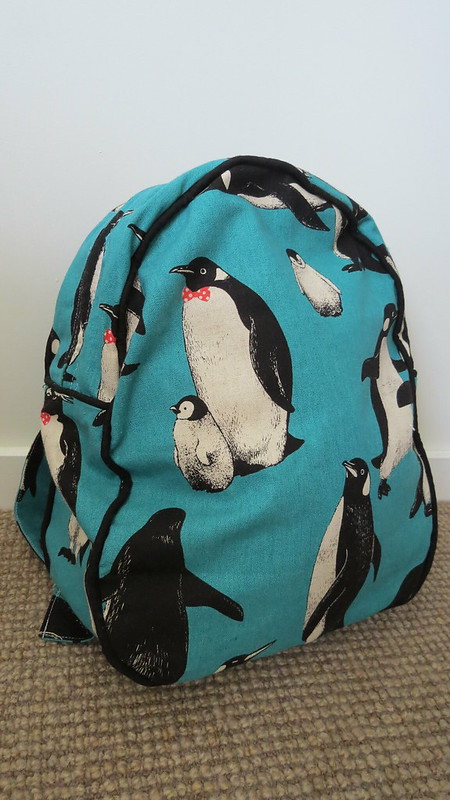
But anyway, you get the idea. This bag is FANTASTIC! and not only does it look great, it holds heaps, has loaads to reinforcing in all the right places, and is really comfortable to wear. Seriously, I want one!

To begin with I was a little worried that it wouldn't be big enough, but I decided to just go with it after reading some other reviews on other blogs. I'm so glad I didn't change the size, as its perfect.

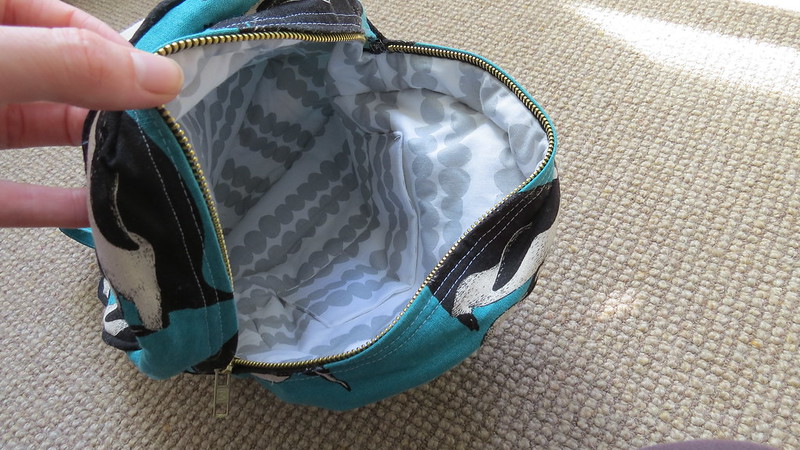
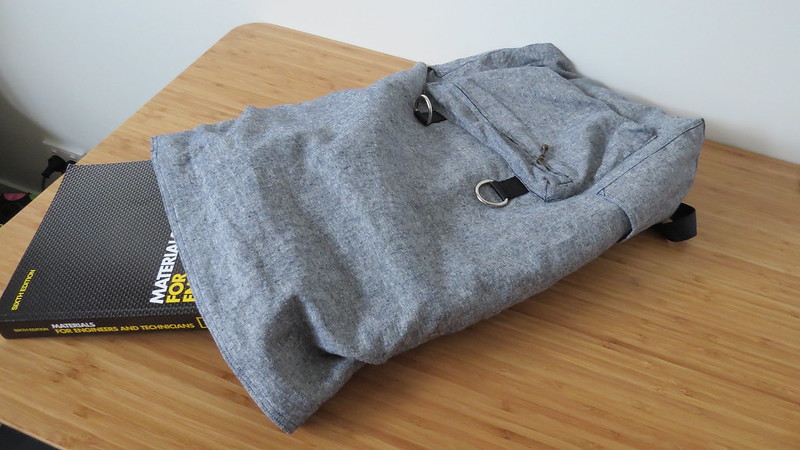
The material was Kaufmann Linen in Indigo, which I picked up for a steal on ebay. I lined the bag with the same fabric, as sometimes the innards can be seen peeking though the roll top (if its not rolled properly), and I think its nice to have the same fabric.

IMG_2067

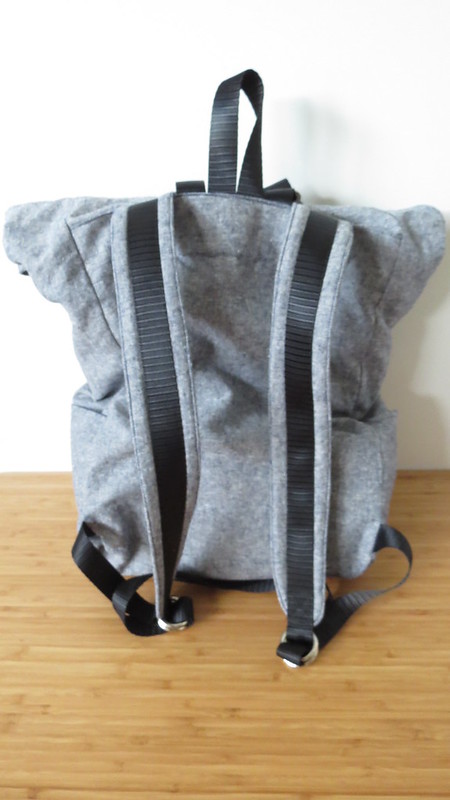
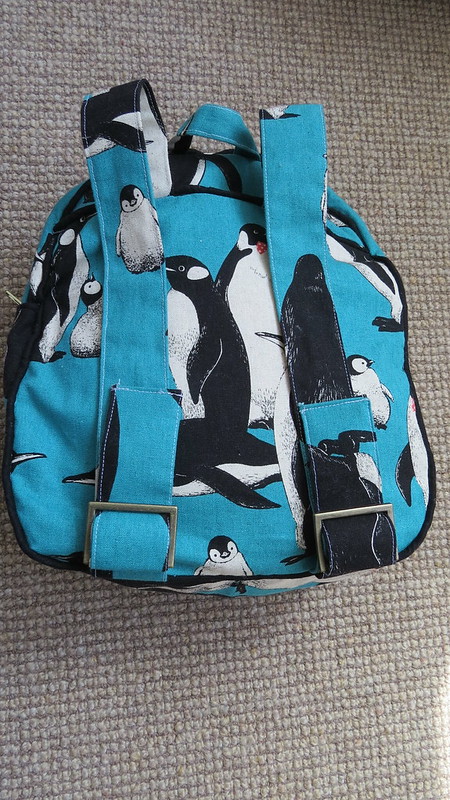
Mr Handsome has already been using this bag (which is why its a little crumpled) and he gives it two thumbs up!
It holds a surprising large amount, and he says its nice and comfortable on his shoulders.

Pattern Alterations:
This pattern is made exactly to the instructions, with a few small exceptions. I put some nice cushy quilting batting (iron-on) in the straps to make them nice and soft, and I lined the lining fabric with medium weight interfacing.

I didn't want to go too-heavy a interfacing, because I wanted to avoid a really stiff, but I did want it to hold a little bit of its shape.

I do want to order some otter wax sometime in the future to make this bag water proof as well. Ill update if and when I do that. 

I also ordered all of the hardware from Taylor Tailor, and its top notch. I'm really happy with the quality. Its probably the best I have ever used!


IMG_2068

And that's it! I know this bag is going to get plenty of use, and with the amount of reinforcing I did, its going to last a very loooong time!

Jessica

Saturday, 6 February 2016

Penguin Backpack : :

Little Mr I started 3 year old kindergarten this week! (seriously will you *please* stop growing!) So, obviously, he needed a backpack to commemorate the occasion!

I own the book "Oliver + S Little things to sew", and if you have read my blog at all, you would probably have noticed I have a slight, ahem, obsession, LOVE for anything Oliver + S!

So it was a no-brainer for me to use the backpack pattern found in this book!
Now, just so you know I'm not completely bias, I have made kids backpacks before, and while those patterns where OK, this one is great!!

Whenever I sew with Oliver + S, I follow the instructions to the tee, because I'm always bound to learn something.For this pattern it was the zipper insertion method! I wasn't entirely sure what I was meant to be doing, but I just follow the pattern and it always turns out great!

Internal Dialog: "why would i want to do that? It looks like your adding a whole load more steps onto something that should be easy liesl!!

Then it clicks why I had to do all those seemingly annoying steps, Que me calling my husband over "come and look at how amazing my sewing is!!"


IMG_2016 

How cute are those penguins?! 

After I finished the outside of the bag, I noticed it was quite floppy. I wanted the bag to hold its shape, and it did cross my mind to put some heavy weight interfacing in it to really stiffen it up, but I decided to go for more of a softer feel and put in some fusible fleece interfacing instead. 
It helps it hold its shape, but also keeps that lovely soft feel as well, which I love.


IMG_2017 

 Other changes I made to the pattern: I make some black pipping and added it on all the seams of the backpack except on the straps. I think it just gives the back a bit more definition, especially as I was using the same fabric for the whole bag.  (I also just love pipping on a bag and will add it whenever I can!)


IMG_2018


I added two rows of top stitching along the zipper as you can see above (pattern calls for one). Don't really have a reason for that change, other than it took my fancy at the time!


And lastly, I also obviously omitted turning the backpack into a penguin (the pattern adds beaks and wings etc to make a penguin backpack). I really wanted to just let the fabric shine without all the extra embellishments, so I simply skipped over the bits I didn't want and just used the basic backpack pattern.


IMG_2020

The insides are from lotta jansdotter, I didn't want it to be too busy in there, so I picked a lovely basic fabric. There is also a small pocket inside. Its quite small. I'm not quite sure what its there for, but I added it anyway as I'd already cut it out.

So there you have it! Mr I has been carrying it around on his back constantly since I finished it! The teacher tried to get him to put it in the locker when we got to kinder,  he wasn't too impressed with that, and did so reluctantly! I guess there's no better compliment he could give me really.

Just for an update, because its been 5 ish months since I last blogged. Lots of things have been going on, I didn't plan on having a long break, but life just happens I guess. Mr handsome has got accepted into University studying Mechanical Engineering and starts in 16 days!! We're really excited about that, but also a bit nervous! Its a 4 year degree and while I know were in for the hard slog, I just feel so excited and blessed that he has this amazing opportunity.

The twins, miss E and miss I are back at school as of last week. We had a lovely summer holiday with them, and even managed to get away to Eden for 10 days camping. (Its a beautiful part of Australia right on gorgeous beaches if you ever get the chance to go!)

AND Little miss S, (who is turning 1 later on in the month), started crawling today!! Shes been up on her knees rocking and trying to crawl for a week or two now, but she saw my embroidery thread box, and crawled to it!!  (girl after my own heart!)

I have loads of projects to catch up on, so keep an eye out for them!!

Jessica

Friday, 18 September 2015

Last Day Of School : :

Today was Miss E and Miss I's last day of term 3. Their teacher is sadly going on long service leave for the 4th term (sad for us, happy for her no doubt!).

I wanted to make her something just to show how much we appreciate all the effort she has gone to in helping our girls. But at the same time I also wanted it to be quick as I only decided this last night :)

I decided on the tote bag from Lisa Liam's 'The Bag Making Bible'. It came together rather fast. I cut it out last night (while watching the Bachelor *shame*) and sewed it up while Little Miss S had her nap in the morning.

All of the fabrics I used were left overs from other bags that I have made. SCORE!


IMG_1646


It really was a difficult thing to photograph, and in this case I don't think the photos do it justice.


IMG_1647 

The brown thick outer fabric is an upholstery fabric I picked up from spotlight about 3 years ago. The lining is a cotton also from spotlight. The black polka dot canvas was left overs from another bag. Sorry, cant remember where I picked that up from?


IMG_1643 

The teacher loved it. I hope she gets lots of use out of it. It was really enjoyable to make, I think because it was just so quick. Nothing like a instant results. 

Jessica

Monday, 31 August 2015

The Nappy Bag NOT from heaven: :

This bag was definitely not from heaven (I'll leave it up to you to figure out where its from).  Although I must say the finished result is pretty heavenly!

One of my good friends is having a baby this October. She is also a sewer (seamstress?) and so of course she is churning out lots of goodies in anticipation of number 5 (!).
Everything I decided to make for her, she's already making! Seriously! My first thought was a quilt (no surprises there) but I think she is currently onto quilt number five at the moment. Then I thought a stool...yup she's made one of those too, and the list goes on.

So I thought I was getting out of it easy when I volunteered to put her nappy bag together.

I was wrong!

This sucker was sooo thick I broke at least 6 needles!! Yes, yes, some of you may question my needle choice, they were just universal needles...and maybe a few quilting needles (What? I was getting desperate!), but the craft store isn't open Mondays, and well, today being Monday....you see my problem?

Anyway, lets look at some photos


IMG_1509 

The fabric is all from fabric.com, and is mostly Cotton and steel. The outer, horse fabric is canvas, with some fake leather accents on the bottom and in the middle of the ruffle. My friend picked the pattern, and to be honest I'm not 100% sold on the ruffle and I was tempted to leave it off, but I reminded myself that its not my bag and put it on there.
Its probably one of the things she loves most about the pattern :)


IMG_1513


It has loads of storage, as every good nappy bag should.

IMG_1516


I added the blue pipping around the lid.


IMG_1518


 (See that baby block? That's me styling! Yeah! I'm doing it!)...that's me being sarcastic if you couldn't tell.
When I was cutting the bag I really stewed over pattern placement, especially on the lid. I knew I wanted a whole horse on the lid, but didn't want it to be smack-bang in the centre. I could've fit two horses on the lid but it looked silly, so after lots of internal debating, I settled on one horse off-centre.

I also *tried* to match up the pattern on the lid with the front of the bag, but it didn't turn out too well, so lets just pretend that I didn't and it just happened like that.

IMG_1511


The last step in the pattern was to top stitch all around the top of the bag. I tried...I really did, but I came to the conclusion that its physically impossible without an industrial sewing machine, so I unpicked my poor, poor effort and left it.  (I don't think I'll mention that to my friend either).

The pattern is called 'The Lola Bea Diaper Bag', Im *pretty* sure it came from Etsy. Check it out if you like it.
You may notice that I omitted the strap and went for a pre-made leather strap from a previous bag. The side ring-holders (don't know what they're called!) were made by me and my ingenious brain! (and therefore are not part of the original pattern.)

Its always hard to sew for a fellow sewer, as they can pick mistakes, but all in all I'm pretty happy with how it turned out!

Next time though...I think I'll just stick to quilts :)

Jessica