Showing posts with label Quilt. Show all posts

Saturday, 9 July 2016

Quilt-a-long Geese : :

Quick update on my last post,  I have finished my flying geese for the Happy Quilting quilt-a-long.

IMG_2216

I'm really loving the fabric that I've chosen. I cant wait to sew it all together!!

I have to work this afternoon, so I have a couple of hours with the kids. I might see if i can finalise my fabric choices for the quilt!

Jessica

Thursday, 7 July 2016

Happy Quilting Quilt Along # 3: :


Well, the tumble weeds have been blowing in around here.
There has been lots of sewing going on, but unfortunately not much blogging.

Ill try to catch up on that later, but for the minute, I am joining in again with Happy Quilting's quilt-a-long. YAY! This will be my third happy quilting quilt, and they are always lots of fun. (Check out my first and my second) You can check it out here if your interested in joining in on the fun! 

I wanted to make a big quilt. A 4 by 4 layout, in king size. I seriously spent hours last night pulling fabric from my stash. I honestly pulled nearly all of it out, and I'm just not feeling it. I just cant seen to get the right combination of fabric!!

It was doing my head it, so I crammed it all back in my cupboard (folding is for the weak!) and I decided to at least start with a cushion!

I'm making a single block, in the smallest size (20 x 20 inches). Something is better than nothing right?  And it lets me still quilt-a-long while i figure out what I'm doing with the quilt.


IMG_2215

The blue/grey upholstery fabric, and the brown velvet are actually left overs from an Amy Butler ottoman I recently made, more about that later.

The navy floral is from happy-go-lucky, Moda, and the others are just randoms from my stash (I think the script is from Michael Miller).

So that's the cutting done!

Cant wait to put it all together! (and figure out my quilt!)

Jessica

Tuesday, 16 February 2016

One For Me : :

I have decided a few things of late.

The first being that I'm going to participate in the "Splendid Sampler".  If you haven't heard of it, I'd highly recommend a look.

I love that its slow place, and I'm also enjoying the surprise.

Instead of picking specific fabric for this quilt, I'm just going to use what takes my fancy at the time. No theme, colour scheme, or anything! (I'm not even going to use all quilting cotton!)

My fabric scraps are also going to be my first port-of-call when looking for fabric.

Ive actually found that I have memories associated with my fabric scraps. Weird right?  I remember what I made from them, and some of things that were going on while I was using that fabric.

While the dresses, bags and other things that I made may have long since worn out (or been donated or gifted), I still remember those things with the scraps that I've collected.

So this quilt is purely for me. For fun. To make a quilt that may or may not be pretty, but will incorporate those memories.

Im putting no limitations on myself. I simply will select the fabric that takes my fancy for the day, and make the block.


IMG_2021

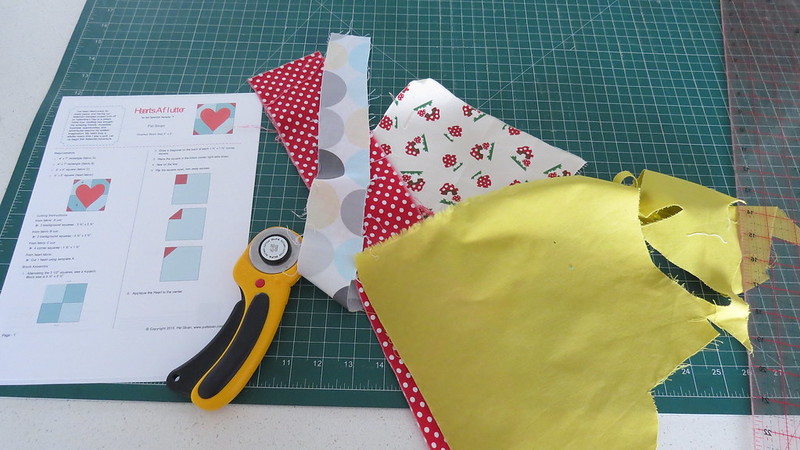
So for the first block, it was these fabrics. The toadstools was from a backpack I made Little Miss I when she started 3 year old kinder. The blue/gray dots, and mustard solid where I dress I made her when I was pattern testing for "sewing in no mans land", and the red polka dot a left over from two baby quilts I've made, one for my sister, and one for my sister in law.

So all those memories have now been captured in this block.

IMG_2022


I'll share my progress on this quilt with updates through out the year. Im interested to see where it takes me.

The second thing I have decided is that I'm no longer going to feel like I 'have to' sew things for others, esspecially when I dont want to.

Ive made so so many things for family and friends. Quilts for babies, bags, costumes, mending, big quilts, you name it, I've most likely sewn it and given it away. 

Some times I enjoy it, most often not so much. So this year, Im not doing it anymore. If someone has a baby, and I dont want to, or have the time to make a quilt, Im not going to feel like i have to.
I can be completely ok with buying baby stuff for gifts, same as everyone else.

Im also not doing anyones mending (seriously, I hate doing my own), nor any other type of sewing that i dont want to.

This has kind of come around because Ive been so busy making things for everyone else that I never even made Little Miss S a baby quilt, and she is turning one next week.

So hears to a year when I only use MY hobby, for things that I want to use it for!!

Jessica


Tuesday, 15 September 2015

Jamming With A Jelly Roll : :

My sister has just recently had her 3rd baby!! She now has 1 girl and 2 boys. So of course I made her a quilt as a present.  (I honestly feel like I write that that line at least once a month!)

Ive been hoarding a jelly roll of Sweet water 'Pure' since Mr Z was born (he just turned 3). If you remember I actually used the same fabric for his baby quilt!

Because it reminds me so much of Little Mr Z when he was a bubba, Ive been really reluctant to use it......but since its for my new nephew, I decided I could part with it. (Well, half of it. The other half I have stashed back away in my cupboard with every intention of keeping it forever)

I wanted a really quick sew, so I decided to use the 'Jelly Roll Jam II" pattern from The Fat Quarter Shop. Check out the youtube tutorial here.

So in between making fun of the American accents on the tutorial (ha ha you should hear my husband) and going to my brothers wedding, this quilt came together so so quickly.


IMG_1610

I love it sooo much!! (can i just point out the blossoms on that tree? YAY! SPRING!!)

Out of all the quilts I have ever made, this quilt is the most well made. It is dead square. For some reason my quilts are never 100% square. But this one is.
Also all of my seams are perfect! (if I do say so myself).
I finally figured out why its so important to press seams in opposite directions so the seams 'nest' together! (slow learner)


IMG_1611

The back I managed to scrounge out of the backing left-overs from the triangle quilt I made recently.
It took a while to cut all the trimmings into usable strips but I'm so glad I did. Its much better for the bank, and its a great scrap-buster!


IMG_1615

To quilt it I decided just to use straight lines. I love it so much!! Its adds so much lovely texture!!
Another score with this quilt is that there are absolutely NO puckers on the back!! YES!! I think I may finally figured out how not to get puckers!! (we'll see how I go with the next quilt!)


IMG_1613
The binding is a lovely linen look cotton that I picked up from my local craft store.

I love this quilt so much!! I've really noticed how much Ive improved at sewing when I look at this quilt...and especially when I compare it so some of my earlier ones.

Well, I'm going to chuck it in the mail today and it will soon be keeping a baby warm in sunny Cairns where my sister lives.  (or maybe it will be used as a floor quilt!! Ha ha its rather hot in Cairns!)

Jessica

Friday, 11 September 2015

WIP: Feather Blocks

At my brothers wedding, my sister gave me some fabric to make Little Miss S a baby quilt. It was a Moda Honey Bun (for those who don't know what that is its like the baby version of a jelly roll, at 1.5 inches). I've never quilted with a Honey Bun before, to be honest, I'd never even seen one! Apparently they don't make many.

At first I really didn't know what to do with it? The strips are quite small. I thought of using a Jelly roll pattern, and making it miniature with my honey bun, but it didn't really appeal.

I finally settled on doing something I've been wanting to do for a while....make a quilt without a pattern!! (well almost without a pattern ha ha)

IMG_1620

I saw on pinterest some lovely feather blocks, and there was a free pattern online!! Score! So, following the pattern, i sewed my strips together then cut out my feathers.


IMG_1618


IMG_1621

For the stems I used some kaufman linen that I had left over from the nappy bag I made for myself earlier this year.


IMG_1622 

I then gathered up some different white-ish low volume backgrounds to use. (see the bottom fabric? thats cotton and steel!! It really lives up to all the hype!)

I've cut enough for 5 feather blocks...they will be my start and I'm just going to keep adding to the quilt until it feels done! '
I'm thinking some tiny half square triangles...maybe even a few arrow blocks too.
I don't really have a plan. I'm just going to wing it!! I've wanted to do this type of quilting for ages! But its so hard to figure out where to start. I think I just over-think my quilts, but this time, I'm just going to go for it.

Hope it turns out OK!

Jessica

Sorry, I cant remember the line of fabric...I know I kept the tag from the roll somewhere. Ill probably stumble across it soon, then I'll let you know. Its cute though isn't it?

Tuesday, 8 September 2015

Triangle Wedding Quilt : :

Last week one of my younger brothers (I have three!) got married!! It was such a lovely day! .....and it was also the first time we have employed the services of a 'proper' babysitter (a lovely girl from church), so it was extra fun to have some kid-free time!
(well almost kid free time! Little Miss S came to the reception as I'm still feeding her, but she slept 80% of the time *BLISS*)

So to welcome a new sister-in-law into the family, and to celebrate their wedding day I made them a quilt!
I really deliberated over which fabrics I should use, as I'm not 100% acquainted with what type of things my new SIL likes yet.
I decided to play it safe and go with something a little 'toned down'.


IMG_1537


I raided my stash, which is happily coming into more manageable levels (and by that I mean actually fitting in my fabric cupboard!), and came up with 'glimma' by Lotta Jansdotter. I've been hoarding this fabric for a loooong time, and its the kind of fabric that could really go with any kind of decor.


IMG_1543


I wanted this quilt to be a quick sew (well as quick as a queen-sized quilt can be) so I grabbed my trusty 12inch equal-lateral triangle ruler and started cutting out triangles.


IMG_1540 

It didn't take me all that long to cut, only about 3-4 hours I would guess?
Once I had my layout down pat, I started sewing. Lots of lovely straight sewing. It really was a very quick sew.

The hardest part of this quilt was definitely the quilting.
The thought *did* cross my mind as I was sewing it all together that perhaps I should do quilt-as-you-go to make it easier to feed through my machine. For some reason I dismissed that thought and joined the whole quilt top together.
BIG mistake!!

Its sooo hard to quilt a quilt of this magnitude on my little Bernina 400QE.
The quilting took me about quadripple the amount of time I thought it would, and even then I didn't quilt it the way I was imagining it in my head.

But never mind. Its quilted now. Ill just remember this for next time...(maybe....I'm a chronic slow learner when it comes to making things easier for myself!)


Jessica

Note: for those interested, the backing is by Riley Blake, called Pirate Matey (its another old line that I've been hoarding!)

Wednesday, 19 August 2015

Baby Boy Quilt : :

You remember how I posted that I made 3 baby girl quilts here?

One for my friend, one for my sister-in-law and one for my neighbour?  Well, I had given two out (to my friend and SIL), and still had the last one to give to my neighbour. I hadn't actually met her baby yet, but I wrapped it up and sent hubby over there to give it to her.

The whole reason I thought she'd had a girl was because Mr handsome told me that he'd seen her with a pink-coloured blanket. Anyway, as your probably guessing by now, when he gave it to her he found out that she'd actually had a boy!!

She said she loved it sooo much though that she was happy to keep it. She even came over to thank me, and tell me how beautiful it was.

I however was frantically whipping up a quilt for a boy so I could swap it with her.


IMG_1430


Honestly, I finished this quilt in RECORD time!! My friend had actually given me the top sewn together to make myself a baby quilt for Little Miss S....but to be honest, I knew I wasn't going to use it for her as to me its more "boy", and I already have a lovely quilt planned for her!
I had to unstitch and resew some of it to make it more of the shape I wanted, then pin and quilt it to the back. I flipped over the back, which is a lovely soft minky, and used it for the binding as well.


IMG_1431 
I think it turned out really cute!

If she loved the first quilt, she a.d.o.r.e.d this one!!


Jessica

P.S. sorry about the photos! They were super quick snaps taken on my living room floor before I rushed out the door!

Monday, 3 August 2015

3 Moda Giddy Mini Quilts (+ tutorial) : :

There are so many of my friends and family who are having babies at the moment! Really! There must be something in the water.....or maybe they all took one look at Little Miss S and got clucky *wink*

Anyway...because there are so many babies that have either just been born, or are currently cooking, I've decided to make them smaller gifts. (I just did a quick count and there are 6 babies!!)

3 of the 6 bubs are girls, and I had a moda "giddy' jelly roll sitting in my cupboard just calling out to be used.

I wasn't ready to commit to cot quilts for each of them (not because I don't love making them, I just really don't have the time...and if I'm being honest, the motivation), but I decided a smaller pram/bassinet quilt would be perfect, especially since its sooooo cold at the moment here in Australia.


IMG_1424


I wanted to keep it simple. No triangles or flying geese...just strips. So I opened my jelly roll (am I the only one who loves opening a new jelly roll?) and selected a good range of colours.....really no need to over think this part....just reach and grab.
When I had a good handful of strips I cut them in half...again no need to measure, I just eye-balled it...and started sewing the strips together into runs of 4. I just kept grabbing more strips and adding them in as needed.
Then once I had a smallish pile of 4 strips sewn together, I cut them into 2 1/2 inch strips. (I didn't take any photos...but its not that hard to imagine)


IMG_1425


After that I just sewed all the strips together and voila! Baby quilt!
I continued this until I had 3 quilt tops.

Then it was a simple matter of pinning to the wadding, quilting the top (just 1/4 inch from every seam), then I pinned it to the back and just run down a seam every 5 inches or so.


IMG_1427


These were the first quilts that I have backed with fleece. They turned out so soft and warm, but not too heavy like minky can be. I think its the perfect back for newborns.
I ran out on the last one however to I threw in a strip of tilda farbic in the middle. It still turned out cute.
I then used left over jelly roll for my binding. 

Two of these quilts have already been gifted and are currently keeping a couple of baby girls warm. This one will be going to its new home tonight.

If your looking for a quick make...I can definitely recommend. They were quick and easy...but look fab!

Jessica

Oh, I should add they measure roughly 32 1/2 inches by 24 1/2 inches for those interested.

Thursday, 18 June 2015

Baby Play Gym : :

I wanted to make Little Miss S something to play with as she is now just about 4 months old (where did that time go?). She is just hitting that really fun stage where everything looks tasty and it all goes straight into her mouth!

I decided to make a baby gym for her as I've never owned one, but I did lend one from a friend and know how much babies like them.  I used the pattern from the book "Sew Modern Baby" by Angela Yosten, which I picked it up on a whim at spotlight ages ago.

However...if I had a crystal ball and could have known how much trouble it was going to give me, I definitely wouldn't of bothered!! 

I'll get to that bit later....first onto the quilt part, the mat!

I appliquéd!!!......AND I didn't hate it!! 
I honestly think this is the first quilt I have ever appliquéd something that looks half decent. 


IMG_1309

(Let me just cut in here to say...i did it on my Bernina...not by hand. That's a hurdle for anther day!)


There are two types of blanket stitches on my Bernina 440QE (number 45 and 46 for those who want to know).

They are both the same, but 46 is double thickness. I decided to the thicker stitch, and while it definitely ate through my thread stash quicker than I would've liked, it looks so much better than the thinner one!! 

I mean, just look at that stitching!!


IMG_1311


And again...


IMG_1308

 
And again....


IMG_1307


Yup, I think I can definitely say I'm more than a little proud of myself!!

Now onto the stuff that seriously gave me nightmares! The arches!! *shudder*
I sewed up the 'tubes' of fabric from my Sarah Jane stash (which is seeming never ending at the moment!! No matter how much I use, there is still just sooo much!).


IMG_1310  

That part was simple enough, but threading the black pipe insulation through the tubes took me hours and hours and hours!! 
Then after I finally had them threaded and sewn together I connected it to the quilt with baby links (like the patterns states) the whole thing just flopped over. (que me chucking a bit of a tantrum and refusing to look at it again for about a week!)

If anyone is planning on making this project take note...this book is American..so the materials listed aren't exactly the same as the materials I found in the hardware store here in Australia!!

After leaving it all in a corner for a few days, I decided to give it one more go and got my husband to go to my parents farm and get me a few lengths on fencing wire. 
I then cut them to length and wrapped the sharp ends in duct tape so they wouldn't poke through my fabric. 

After unpicking, threading then re-sewing, I can finally say that it works!! *happy dance*

And the best bit? Little miss S Loves it...which I guess makes it worth it in the end!! 


IMG_1312

She is seriously happy under this thing. I love how I can change up her toys as well so she gets a bit of spice in her baby-life.

Jessica


Tuesday, 16 June 2015

Beautiful Bow Quilt : :

Have you ever had a project that you just wanted to be perfect?
Most times when I quilt I do try for perfection..perfect seams, perfect quilting but I don't get too carried away if things are a teeny-tiny bit off.
But for my kids I wanted to make them all a special quilt each. The type that they can give to their children when they're all grown up (not yet please!)

Well I FINALLY finished the first one. I wont tell you how long I've been working on this quilt (but I will say it would be measured in years, not months!). Its for Little Miss I. I chose the fabric randomly, instead of using fabrics from one line of fabric (which is what I usually do), and I think its perfect for a little girl!!

I wanted it to be a little bit vintage (and one or two of the fabrics I used are definitely vintage as they were given to me from an older lady who had had them for years and years!)

I also didn't go with all quilting cotton, I threw in a bit of eyelet fabric for added texture and to make it look more vintage-like, as obviously quilts were originally made of left overs and the 'good bits' of worn through items.

This is without a doubt my all-time favourite quilt.


IMG_1299  

 I. love. this. quilt!!

When I was looking for fabric, I pretty much just picked anything that was floral and pretty. I also tried not to introduce too many clashing colours, but at the same time tried to keeping them miss-matched enough that it looked vintage.

I nailed it :)

IMG_1300


All the way around the edge is a super cute ruffle. I've never added any type of 3D accent to my quilts, but I'm really loving how it turned out.
The bows are 'free' as well, and by that I mean that they can move. They are obviously sewn into the seams on the edges but the rest has been fed through the middle square that was sewn onto the cream fabric.


IMG_1302

Its just so pretty. 


IMG_1300

 To quilt it I stippled in the cream background behind the bow, then stitched in the ditch along the seams, continuing from one block to another. The pattern is supposed to be quilt-as-you-go (QAYG), and I have made a QAYG quilt before, but I used a different method last time, and the way the pattern tried to explain it I just found it too complicated and fiddly (which probably says more about me than it does the pattern), so I just sewed all the front together and quilted it like normal. I find that the extra throat space with my Bernina really does help when quilting quilts this size.

I used some lovely floral blue fabric for the binding. I usually cut my binding 2 1/2 inches, but I decided to make a wider binding for this quilt. Its not too much wider than normal, I cut 2 3/4'' strips, but I do like just that little bit extra thickness around the edges.

For the back I used some strawberry-print cotton that I've been hoarding for years in anticipation of finishing this quilt!


IMG_1303  

I think it goes really well. You can also see the quilting easier in this photo.

 For some reason I've never really been into the whole pieced quilt backs (maybe I'll join that party extremely late...like I do with pretty much all trends!). For now I prefer to have a nice uniform back! I also pinned this quilt extra carefully and it really paid off....look!! No puckers!!

Quilt Details:
Pattern: Beautiful Bows by MoonShine Designs
Fabric: Random finds from about 3 different stores, and some old vintage fabric
Size: 60'' x 84'' (or 152cm by 215cm)
Blocks: 24

Little Miss I adores this quilt! She has been waiting and waiting for me to finish it for quilt some time (only about half her life!!).

Now that its finally done I can move onto something else!! Little Miss E (Little Miss I and E are twins) of course wants one...but I'm thinking of designing my own quilt this time!! She wants princesses..but I'm thinking strawberries? 
I'm thinking about making a matching quilt with the same fabric, and same block size, but different pattern. 

We'll see :)

Jessica


Tuesday, 21 April 2015

A Very Belated Baby Owl Quilt : :

Want to know how slack I am sometimes?? Like REALLY REALLY slack?

 Ok, confession time! My good friend had a baby girl, and while she was pregnant I started making her a quilt. Ok, so far so good your saying.....here's the doozy, I only just finished a few weeks ago, and that unborn baby is now almost 18months old ....*shameful*!

My friend Kate is really into owls (well she was when I started this quilt), so I found a nice owl quilt pattern and decided to make it for her. The quilt came together quickly enough...but when I came to the applique I just lost all motivation!!

I LOATH appliqué!!  Its not that I don't like the look of it, I actually find it really pretty most times, its just I am absolutely no good at it and hence avoid it at all costs.

But for some unknown reason I thought it would be a good idea to give it another shot. Like in the two or so years since my last pathetic attempt I have some how become good at it. ..um...NO! If anything I have become worse *surprise surprise*.

So I had to forced myself to finish it (with some selfish-sewing bribery). I must confess I didn't enjoy a single moment of quilting this quilt. I just wanted to give it to her and never see it again.

Good news is she loved it and the baby (ermm...toddler) is still in a cot so she will get some use out of it now the weather is getting cold.

Before she took it home I asked if I could just take a quick picture of it.


I used the applique stitch on my machine for everything except the tail of the owl. I don't know why, but I did the tail by hand, and there is a very good reason why I didn't take a close up of that!

Well you cant love everything you make...can you?

Just for reference the fabric I used was a mix of a 'posy' charm pack and 'children at play'. The pattern was from "Acorn Quilt & Gift Company", called Remember whooo loves you.


I'm sooo glad I've finished that one....next time I feel like appliqueing (if there ever is a next time), I'm going to re-read this just to remind myself how much I don't like it!!

Jessica

Tuesday, 14 April 2015

Another Baby Quilt : :

This is a project that I completed last year before sewing became un-enjoyable (for some reason it felt like such a chore while pregnant!!).
My brother and sister-in-law had a lovely little girl so I decided to make her a quilt!! (Like I do every time someone has a baby!)

Here is my labour of love (aka the quilt)...


Ha ha this photo makes me laugh! I had my 6'3'' husband hold up this quilt and told him to crouch down. Poor guy was so uncomfortable trying to keep his head out of the picture! The whole time he kept asking me to hurry up and take the photo. What I put that poor man through! Love him!

This pattern was from one of Camille Roskelly's books I have previously mentioned here, here and here (and probably half a dozen other places that I cant be bothered linking to right now!)

 I used the Riley Blake fabric line 'The simple life', which is pretty old now but I've been hoarding it for baby girl quilts!
I also threw in some Kona solid fabric for the boarders, background and binding, and backed it with some Tilda fabric I got from my local craft store. 
 I used my machine to attempten a loopy-type stitch using the BSR. Not too bad for a first go hey?
Of course the BSR helps immensely!


 I've really got to work on my free motion quilting...but practice makes perfect I guess. Overall, I'm pretty happy with it (although I know its a far cry from perfect!).


I've also started being 'good' and labelling my quilts!! I think this is the first quilt I have actually labelled! I know some people like to include information about the quilt and what-not on the label..but hey at least its a start!! 


I liked this pattern so much I started making a boy version. Its still sitting unfinished in my cupboard (of course), but I know as soon as someone has a boy, that will be the kick up the bum I need to whip it out and finish that one too!!


Jessica

Saturday, 7 June 2014

Grandma's 80th Birthday Quilt : :

In April it was my grandmothers 80ths birthday. Is there a better way to celebrate turning 80 than with a new quilt? Nope, I couldnt think of anything either!

I decided I wanted to make a quilt using a Jelly Roll (my 1st ever!). I wanted to use one because I wanted to make her a queen sized quilt, and didnt want it to take me too long!
After a few sneaky phone calls to my aunt about what types of colours nan does and doesn't like, I decided to get 2 Lario Jelly Rolls.

Lario is by 3 Sisters for Moda. Its a traditional-type fabric, but still has some really nice colours.
My grandma is a traditional sort of lady so it was a match made in heaven!

I borrowed a Jelly Roll book from my friend and decided to make the pattern 'Daisy Chain'.
(hmm hmm, I actually was going to go with another pattern, but ran out of time!)

It actually sewed up really quickly for a queen quilt, but I was still rushing to finish it because as usual I had procrastinated for about....only a YEAR!

Yes, I began planning this quilt at her 79th birthday and had all these wonderful plans to start and finish it waaay before her 80th.

I didnt start cutting this quilt till 1 week prior.
Need I say more?


So here is it being used in my grandmas bedroom. For the background I used Kona snow, which was perfect with Lario. Snow isn't as 'stark' as white, which was nice for a more traditional quilt. 


I backed it in a peach coloured backing I got from my local craft store. To be honest, I cant stand peach coloured things (it reminds me of 80's shiny bridesmaids dress and dated old bathrooms), but it went so well with the quilt, and was wide enough that I didnt have to have any seams on the back. SOLD!

And my nan didn't mind it either, which, of course is the most important thing!

To quilt it, because I was sooo strapped for time, I used a wavy stitch on my Bernina, and just stitched the width of the quilt on every seam. For some reason I thought it would be quick -It wasnt!

But it looked ok. I think I would've preferred to stipple this quilt (if I was being honest) but I really didn't have the time......

NEXT time, I wont leave it till so late! (Says she who is still making a baby quilt for a baby that is now 4 months old!)

Jessica

Wednesday, 2 April 2014

Star Light Star Bright!!

If you follow my blog you will know that I am doing the Happy Quilting Quilt-a-long!!
I chose to do the 4x4 Queen layout, each block in this layout is 40'' square!!
I love love love the large blocks!! After finishing all four of my blocks, I realised that I don't really need another queen size quilt....

But what I DO need is about 4 baby quilts!! I don't know if this is allowed (sorry Melissa!) but I *think* I'm going to just leave the large blocks as they are and turn them into baby quilts!!


I'm not 100% decided with this..I may use one of two as a baby quilt, and then whip up another few blocks and turn the whole thing into a quilt after all....or I was even thinking of backing it in laminated cotton and making a picnic quilt......or using 1-2 for baby quilts, then making little picnic quilts for tea parties for my girls...

Ha ha, as you can see, I'm not 100% yet what I'm going to do with these beautiful quilt blocks! I love how they are just so darn versatile!


Sorry for my lack of ironing.....My twin girls have to go to see the speech pathologist this morning, and I didn't want to be running late, so I had to just take a quick snap. I'm also working tonight (I'm a nurse), and I wouldn't get this up in time for the grand prize ...*fingers crossed*!
Ill take some better photos in the coming days and show you my other four blocks!

Jessica

Tuesday, 11 March 2014

Block Corners : :

So...I finally caught up with the Happy Quilting quilt-a-long. I was soo far behind! There has been so much happening here lately, some good, some bad.
Good news is our house is sealed up! We pulled down all the internal walls that needed to come out (we are renovating) and then had to lay the floor. Its been a trying couple of weeks with birds coming in and out of the house, but its finally all closed off!!

I have finished this weeks assignment (just in time too!) ...so here are my block corners for my quilt!


I cant wait till its all sewn together! I haven't used the BSR on my new Bernina 440QE yet, and I really plan on putting it to the test on this quilt! (By the end of quilting a queen quilt, one would hope I would have the hang of it!)

I have lots to put up here and now I have found my charger to my camera, I can finally take some photos of the things I have been making!

Jessica


Wednesday, 19 February 2014

Star Light Star Bright Half Square Triangles : :

The next assignment we have been given in the Happy Quilting Quilt-a-Long, is the half square triangles.  Nearly there!! YAY!!


I cant wait for the next assignment! My favourite part about quilting is putting the blocks together. I changed the layout ever so-slightly that Melissa gave us. I really hope it turns out well!

Something that I have never done before I started following Melissa's blog, is trim my half square triangles. As you can see above, most of them have been trimmed, but some haven't (I will remedy that before I sew them into the blocks!). Since the first time I trimmed them with her last quilt-a-long I have always trimmed them!

I'm always surprised that no matter how carefully I cut, and how precise I try to be with my 1/4 inch seam, they are nowhere near perfect!! Trimming not only makes them the perfect size, but gets rid of those annoying dog ears, that get in the way when sewing the blocks together!

If you want tips on how to trim your half-square triangles, Melissa has a fantastic tutorial over on her blog.

Jessica

Saturday, 15 February 2014

Flying in Formation : :

After all the renovating work we have done this last week, (we have removed 3 walls, painted the exterior, and put some of the new timber floor down) I decided that I wanted to play with some fabric I've been dying to use for about 6 months now!


Its an organic cotton called Tsuru, and I really love the oriental feel it has! Ive been hoarding it for long enough now! Its time to bring it out so I can use it!
I chose a BEAUTIFUL linen for the background! Its really really nice and I think it lends itself to the oriental, natural feel I'm going for.

I was going to be really boring and just copy a quilt design that I saw recently, which IS nice, but I decided to go out on a limb and take my first stab at designing my own.

I wanted to keep the design simple, and not overly crowded.
After trying out a few different designs on paper, I have decided on this one :


Or something like this one anyway! I really enjoyed making all those flying geese last week, and I still want to make more.

I'm going to call my quilt 'Flying in Formation'. (Is it weird to name a quilt before its even made?)

If it turns out any good perhaps I'll even write the pattern up and share it here on my blog.

Jessica

Monday, 10 February 2014

Star Light Star Bright Flying Geese : :

The next step in the Star Light Star Bright quilt-along is the flying geese. I love love love the way Melissa does hers. I do them this way every time.
However everything was combining against me making these flying geese last night!
After first realising that I had done all my cutting wrong last week,  re-cutting everything, sewing my fabric together the wrong side down, then having to unpicking it all and sew them again, I finally have my super-sized flying geese to show for all that frustration! (I was seriously thinking of just giving up on this quilt-along...for like half a second. So glad I didn't!)
So here they are....flying in formation!


I am LOVING these colours. SO fresh and lovely.
Be proud of me. Seriously. I did all of my trimming by torch light last night after the power went off for 8ish hours! Pretty much as soon as I had finished ironing my last 'goose', off it went. Thank heavens I didn't need my sewing machine or iron anymore!

Hope next weeks assignment runs a lot smoother than this one!

Jessica

Wednesday, 5 February 2014

Star Light Star Bright Cutting : :

As part of the Happy Quilting Quilt-A-Long that I've joined I have to post a photo of my weekly process and link it up on the Happy Quilting blog.

I decided to go with the Just Wing It fabric. I also completely changed my mind and I am now making a 2x2 block quilt. Each block will be 40'' x 40''. I'm using Kona white for the background which Im excited about as I don't have any white quilts yet, and I'm hoping it will have a lovely fresh-modern look to it.

So here is my progress thus far...


Last time I did a quilt a long with Happy Quilting, I chose a 4 x 4 block quilt. It looked fantastic, but it was soo much work making 16 blocks. I'm very happy to be making only 4 blocks this time!

Jessica


Friday, 17 January 2014

Quilt-A-Long with me! : :

I'm so excited!! Melissa over at Happy Quilting is having another quilt-a-long!!
I joined the fun for her last one, and ended up having that quilt on show!!

This quilt-a-long is called 'Star Light Star Bright'. Here is a picture of the pattern using a bundle of fabric that is for sale (check out Melissa's blog for more info).


 Cute huh?
So....for this one I *think* I have decided to do a 3x3 queen sized quilt (there are lots of different layouts and sizes to choose from).
Now just for picking out my fabric.....Ive raided my stash (in true stash diet style), and have come up with two different fabric bundles that I could use for this quilt.  Help me choose!