Monday 30 September 2013

Vintage Baby Quilt

My Sister had her first baby back in February last year. So of course I wanted to make her a quilt. My sister back then was really into pastels and muted colours. So I decided to make her a bright quilt. (Being the eldest of 6 children, its my birth-right to know what my brothers and sisters need, and dish it out accordingly!)

After much searching I settled on this Vintage Baby Quilt pattern. Its really really cute. The squares are not pieced into the quilt, but are sewn on top, so the edges get a lovely vintage ruffled feel.


I ordered a kit from a fabric store on Etsy called Quilt Taffy. They were so helpful. They sent me numerous photos of different bundles of fabric so I could pick which ones I wanted. They also cut all the squares for me, which was awesome! The price was really good too! (which is always important)

I thought this quilt would go together quickly, but it was an effort!! Getting each square to sit straight on the fabric and then sewing it was hard.    


I made this quilt bigger than the pattern, as I want it to get lots and lots of use. (The quality of the photos aren't that great because this quilt is actually in Queensland, and I had to ask my sister to send me some photos of it.) 


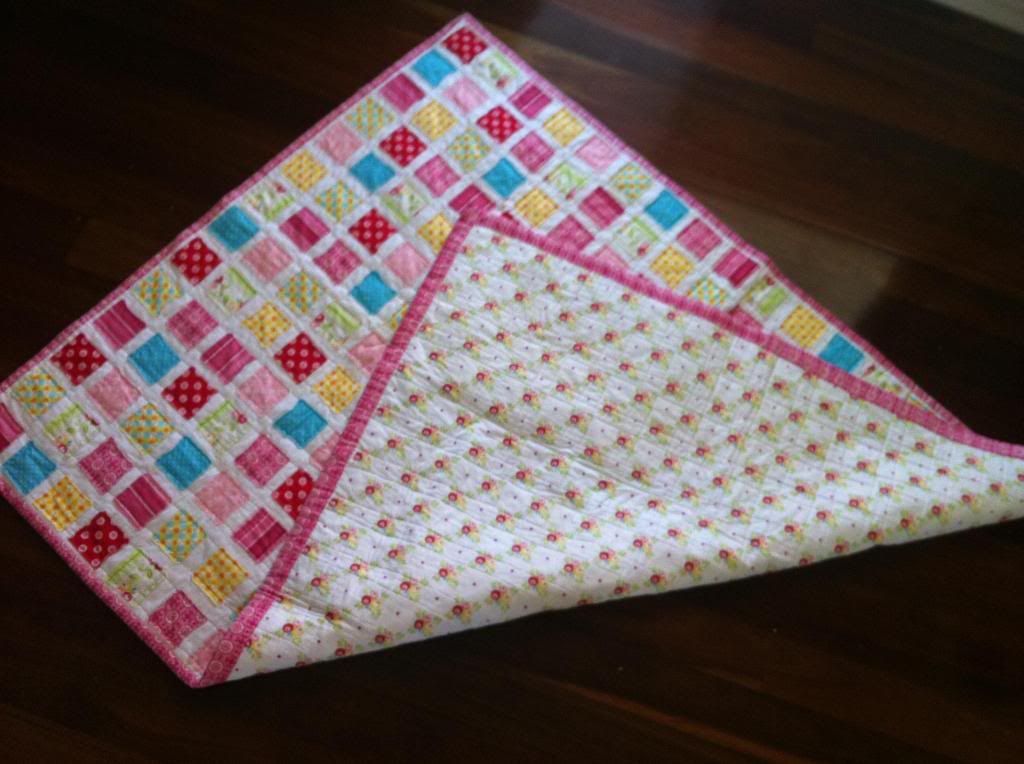
I love the back of this quilt! Its hard to see, but its such a sweet print, especially for my gorgeous little niece! 

I will definitely use this pattern again! Such a simple design, but it looks so lovely. I have actually been dying to make a baby girl quilt, but boys seem to be the trend amongst all my friends lately!


My sister is actually having her second child in about 4 weeks, (yep, a boy) and I'm going to make her another quilt. Cant have my handsome little nephew using a pink quilt!


Toodles!

Jessica

Second Family Reunion Dress (Oliver + S)

As promised here is the second Oliver + S Family reunion dress. When I made Little Miss I's, Little Miss E wanted hers to be the same. Its funny, some days they want to be dressed exactly the same, and others, they don't want to be anything like each other! Ugh! Twins!

When I went to the fabric store to get the same fabric, I noticed that there was this lovely pink and orange fabric, with the silver threads running through it just like the last one. So I decided to get this instead. I'm glad I did as Little Miss I is slightly taller than her twin, so I lengthened her dress by an inch or two, whereas this one I made to the pattern. I want to be able to tell them apart.


I swear my girls are nothing like me. When ever the camera comes out, they are full off poses. Like this one below. One leg, and one arm in the air? Perfect pose according to my 4 year old!


I put 4 little pink buttons on the front of this one. I love the detail.


For the back I found these awesome orange buttons. They kind of remind me vintage-type buttons (I'm not going to try and guess the era). I almost remember seeing similar buttons on something my mum used to wear....


Lovely button up back. I don't know why, but I love this look :) I also love the pintucks on the front and back.


And here is a close up of the hem. I mentioned this in the last post but forgot to take a photo of it. It adds a nice detail, and a bit of weight as well. 


As usual Oliver + S patterns are great! Instructions are so clear, and the results are so professional. The patterns have mentioned 'French seams' a few times. I have no idea what they are. When I finish a seam, I just zig-zag the raw edge. A French seam sounds a little more classy though...I might have to do a quick google search and find out what it is!

Later Vader,

Jessica

Wednesday 25 September 2013

Monster Play Quilt

When Little Mr Z was smaller, and learning how to sit up (*sob* who stole my baby and replaced him with this cheeky toddler?), I wanted my make a thick quilt that he could use on the floor so he wouldn't keep banging his head every time he toppled over.

So I gathered up my fabrics and started cutting. I cut the fabric into strips, 4'' wide, 3'' inches wide and 2'' wide. Once I had all the stripes I just sewed them all together to make the quilt top. 

I decided after that that I wanted to make the quilt tactile, and add some little ribbon tags, as Little Mr Z loved to suck tags. I also thought it would be a good way to secure toys to the quilt so when he dropped them, he didn't loose them. 

So I went and purchased some red and blue ribbon, and unpicked small sections of my quilt to add on the tags.

I really like the tags on the quilt, and Little Mr Z does too!


I have this pattern, from the Australian designer 'Don't look now!' 


She has some amazing designs, and I really love them all! 

I decided to appliqué a monster onto the quilt.
Now I have to be honest, I don't like appliqué. My type of sewing is bang it threw my machine as fast as possible. Appliqué just seams like way too much effort, and it reminds me a lot of 'Nana quilts'. Yep, you know the ones I'm talking about. Country colours with appliqué flowers all over it (not that there is anything wrong with those quilts, its just not what I like for my home).

So I was super surprised when I actually really enjoyed making this monster! Seriously! I was considering appliquéing more of the monsters all over it!


 After my quilt top was completed, I pinned it to two layers of cotton wadding, and the back. I thought the extra layer might of made pinning and quilting difficult, but it didn't. I hardly even noticed it while sewing. 

I decided to be adventurous with my quilting, and did a whole lot of different patterns as you can see below. 


I then bound it in a great green circle print fabric (cant remember who it was from), and there you have it. One perfect floor play quilt!


This quilt has had tones of use, as during winter I also have used it in his cot when its been cold. 


Here is the back


I love making quilts!

Jessica

Tuesday 24 September 2013

My Perfect No Cook Play-dough Recipe

Now I know that there are a million Play-dough recipes out there, and mine isn't anything special, except for the fact that its the one I like to use (which I suppose makes it pretty special!)

I like to make play-dough this way as I don't have to mix anything over a stove, and I generally have all the ingredients. It also makes super soft lovely play-dough that will last near forever (if stored in an airtight container), or until the kids decide to destroy it anyway :)

My Perfect No Cook Play-dough


Ingredients:
3 cups plain flour
4 tbls cream of tartar
2 tbls cooking oil
1 cup of salt (plus a little extra)
food colouring
2 cups water

To make this fantastic play-dough Put 2 cups of flour (not the full 3), the cream of tartar, cooking oil, and salt into a mixing bowl. Then add your food colouring. There really is no set amount for the food colouring. Just add however much you think you need. I generally add a few drops then add more if it needs later.


Mix well.


Boil the water in the kettle, and add the 2 cups to the bowl. Now, It will be HOT, so I start of the mixing with a spoon. 
Once its cool enough to put my hands in, I take off my wedding rings (really, you don't want to forget this step. I did once, and it wasn't fun!) and start mixing with my fingers.

Add more flour as needed. You want to keep kneading the dough until the colour is evenly distributed throughout. For every grab-full of flour I add, I add another pinch-or-so of salt. Keep kneading and adding flour until its no longer sticky. You should be able to put your fingers into the middle of it, and not have any play-dough stuck to you.
Viola! Lovely play-dough!


When I made mine, Little Miss E and I couldn't decide what colour to make it.(In other words they were both gripping the colour they wanted and crying 'I want pink', and 'I want blue')
So I separated the mixture into two bowls and made half pink and half blue. (They will end up mixing it together and it will turn a funny colour, but at least we avoided that argument!)

Enjoy!

Jessica

Work In Progress

I haven't finished anything for a few days, so here's what I'm currently working on....

Its a terrible photo, but the second Oliver + S family reunion dress is coming along nicely. I should finish this soon (if not tonight).


 Speaking about clothes making. Here is a lovely stack i have in my cupboard for future projects. I really want to finish the above dress so I can get started on some of this!


I have some cute poly-cotton on top for Little Miss E & I's next dresses, which will be the Oliver + S Ice-cream dress. Next is some lovely cream silk shantung. It was expensive at $20 a meter, but oh-so-lovely, so I decided to get some (and I had a discount voucher). I want to make the petal sleeve blouse from the Japanese sewing book 'Feminine Wardrobe'. I wont be doing that for a while yet though, as I don't want to mess it up! I will practice on the twin's clothes first :) The rest is going to be clothes as well, but I'll write more about that soon!

Another sneak preview, but shhh! This is part of Little miss E's Christmas present, and I've thus far managed to hide it from her.........


What is it? You ask, well its not finished but it will soon be this....


The picture on the pattern doesn't look terribly exciting, but I saw one made up at the Craft show in Melbourne, it was so cute! The one I saw made up was made from Sarah Jane fabric, using an out of print line. I have about 1 meter of it stashed away, and I was going to make it up exactly the same as the display, but I decided to save it. I have a quilt in mind that I want to use it for instead (and also I figured Little Miss E will probably drag this teapot set around everywhere, including outside, and the other fabric is white).


I did find a really pretty lamp-work bead to go on top though! 

And lastly, I have been thinking about making a christmas stocking for Little Mr Z. I have made one for everyone else, but I just didnt get around to making one for him last year, so I will be making one for him soon!
Here is the one I made for Little Miss E.

I really really love it. I like gold Christmas decor, so all of the stocking I made have the same gold top, and a gold patterned fabric like this one. I used a gold bead trim to line the fold-over and to put the letter on the front. I then also used some gold ribbon attached to the corner for hanging.


To attach the trim I had to hand stitch between every-single-bead! It took forever but looks really good!


The photos don't really do it justice! 
My sister asked me about my Christmas stockings, and as she lives in Queensland, (and is too far away for me to just show her) I'm going to post a tutorial of how I made them shortly!

Come back soon to see these WIP's completed :)

Jessica

Tuesday 17 September 2013

Oliver + S Family Reunion Dress!

After my recent success with a Oliver + S pattern, (here and here), I was keen to try out another one.
I decided to use the Family Reunion dress pattern


This pattern has cute little pintucked pleats on the front and back of the dress, gathered sleeves (what little girls doesn't love a good puff-sleeve?) and a button-up back. 

There are two versions in this pattern, A, which is a dress, and B which is a top. Since its nearing summer I decided to make the dress (View A).


So after a brief trip to the craft store (well brief for me, a very long time for my husband sitting in the car), and a few hours cutting and sewing, Voila! We have one very cute summery dress!


The fabric is a sweet poly cotton with silver threads (you cant really see it in the photo). 
I decided to use some nice lime coloured buttons for the back, and four darker round green buttons for the detail on the front. (Little Miss I thought they looked like smarties, and tried to bite one! Luckily it didn't break!)


If you look closely (or click on the picture to enlarge it) you can see near the hem six rows of top-stitching! It looks really good, and adds weight to the hem as well. I would like to make this dress in a solid fabric, then use a contrasting thread to make all the stitching really stand out.

I love the pintucks and buttons on the front! I had to remove a few of the front buttons because I was too lazy to transfer the button guide from the pattern. How hard can it be to sew 4 buttons on? Obviously harder than I thought!


I'm really so happy with how this dress turned out. As always Oliver + S patterns are brilliant! They are easy to follow and give super good results!

Of course as soon as I showed my girls the dress, Little Miss E started 'mummy, you make mine?', so I will be posting a second family reunion dress soon I suspect!

One thing that I wanted to share, whenever I use a dress pattern, I am always really bad at transferring the markings onto the fabric (notches, darts, etc). For this dress I using a grey-lead pencil to mark out the pintucks. It was really hard though and I ended up licking the pencil to get it to mark the fabric!

I was talking to the craft store owner about it, and she gave me (well, sold me) a Chaco pen!! Its awesome!!


Its a 'pen', filled with chalk, I got blue, but it comes in different colours. It has a tiny roller on the end and dispenses a tiny, straight line of chalk!


It cost me about $7, and was so worth it! You can get refill chalk for them as well! My pencil-licking days are over!

Ciao!

Jessica


Monday 16 September 2013

The Quilt and Craft Exhibition

Last weekend was the Warragul craft and quilt exhibition. I was feeling so sick, but I dragged myself out of the house for half an hour, and my mum took me to Warragul to see my quilt. 


It was so big they had to fold it back over the bar so it wouldn't drag on the floor. The organisers told me that they didn't get many big quilts because of the cost in making them.

It was really exciting to see my quilt being displayed. I'm glad I went, although when I got home I was exhausted and went to bed at 730 pm, and slept all night!


I am really happy with how this quilt turned out. Every time I look at it I see the hours and hours of time and effort I put into it.


The show in Warragul is held once every two years. I plan on having an even better quilt for the next one to display! 

The show ended yesterday. When I got my quilt home Mr Handsome and I decided we would save it for when we sleep in our new bedroom for the first time! So its safely packed away for now, but I cant wait to see this beautiful quilt on my bed in my new bedroom!

Jessica

Thursday 12 September 2013

Star-Surround Quilt!!

It's finished! It's finished!

*does a little happy dance*

I first mentioned this quilt here.
But before I bore you with details, lets admire shall we?


(If you want a closer look, just click on a photo and it will enlarge for you!)

*sigh* I love finishing a quilt! There is nothing better than having a nice quilt to snuggle under.........hang on!!! YES THERE IS!! How about having your quilt displayed at the local quilt and craft exhibition!!!

Yes, that right! My quilt is ready to be hung tomorrow at the Warragul Quilt and Craft exhibition! I'm so excited!
While I was dragging my quilt through my local craft store, the lovely store owner suggested that I should enter my quilt into the exhibition. At first thought...yeah right! I'll never finish it in time (on Monday it was only a pile of blocks), but then I decided it would be A-MAZ-ING to have my quilt displayed, so I decided to do it!

I can say that I have broken nearly all my fingernails pinning this quilt, (I pinned it twice with my favourite quilt-as-you-go method), and my wrist is a little sore from shoving it through my little Janome 5027le, but it was worth it!

When I was deciding how to quilt this quilt, my original plan was to quilt it fairly heavily. I was going to straight line quilt it following all the pieces in my quilt, and in my head, it was awesome.
But then when I started, it so wasn't.
I ended up doing a lot of unpicking! (I loath unpicking and tend to avoid at all costs, so believe me when I say, it looked really bad!)
I then decided to just to stick with my old-faithful method of quilting. Which is just straight lines :)
I quilted my walking foots width away from all the edges of the stars. It looks much better. The quilt really sings all by itself, without the need for heavy quilting. 


Thanks so much to Melissa over at Happy Quilting for this lovely quilt-a-long! The finals are one the 16th of September with 4 great prizes!! I'm really hoping to get one, because the prize is a $75 gift card for fabric shopping!

Well, I need to get some sleep for my big debut tomorrow! (I'm really just dropping my quilt off at the local hall)

Ill put up some photos of my quilt at the exhibition! Cant wait to get some better photos, rather than just taped to the extension part of our house!

Toodles!

Jessica

OK...just one more look :)


I should mention we have high ceilings too, (Or rather, we will when we actually put the ceiling up there!) so its bigger than it looks!)


Saturday 7 September 2013

Japanese Sewing & Megan Nielsen!

In my search to find nice patterns to make for women (aka ME!), I have come across Japanese sewing patterns! I don't know if you have ever seen them, but there are so so many, and they all have beautiful feminine patterns (well most do anyway!)

After looking around I ordered Feminine Wardrobe from The Book Depository. If you haven't heard of The Book Depository, I recommend heading over there! Thousands of books, all at really good prices, with free shipping! It can be dangerous to the bank account though :)
I really wanted to buy the Japanese version of FW, but I thought I had better start with the English copy so I can get a feel for Japanese patterns. Only a handful of Japanese sewing books have been translated, and I'm looking forward to the challenge of creating something from a real Japanese pattern!

I'm still waiting for my book to arrive, but a few days ago on EBay, I stumbled across a treasure!
I found some vintage Japanese sewing book by Stitch house. Only one has arrived, and I'm waiting for 3 or 4 more. I picked mine up really cheap! One book was only $3 including postage, and has 164 patterns!

The one that I currently have is "Though girls begin to feel more fashion-conscious, nothing on the market is snug and taut. Produce a good fashion with mom-made clothes". 
Phew! What a title right!?

Inside are the cutesiest dresses and clothes! They are all vintage looking, carefree children's clothes. I'm a strong believer in letting little girls be little. I don't see the need to dress them in 'adult styled' clothes.  


This is an example of what the patterns look like. The book is full of little cartoon pictures that model the clothes :)

Just look at that sailor dress! How adorable! This is going to have to go on my must-make list :)
As well as having really great patterns, this book is also highly entertaining! Check this out...


Good to know that even with my clumsy sewing hands, I can still use this book :)

Yes sir-ee! This is what delights me :)
 

And now for my person favourite. Please remain goodie goodie children till I'm finished sewing! I so want to blow this up and frame it above my sewing desk!
I am really looking forward to making something from this book. There are no pattern pieces in this book, rather you have to draw your own on the fabric, using the pictures and measurements they give you. should be a nice challenge!

Now, onto the other pattern I got in the mail this week! For a long time, I have always admired Megan Nielsen patterns! She has some really nice clothes, including a maternity range. I decided that since its coming up to summer (and our summer holiday)I decided to make these Culottes!


 (If your wondering why my scissor case is on the pattern, that's because I have this odd ball compulsion to write my name on everything, so I covered it up)

This pattern looks like a circle skirt, but is actually culottes. What a fantastic idea!


Inside it comes with a cute instruction booklet, with optional variations on the pattern. I'm going to make mine knee length. I have ordered a cute blue and white polka-dot fabric for these. I can't say how exciting I am to be finally using this pattern.


(I just re-read this and realised I really should get out more!)


 Another thing I really appreciate is at the back of the booklet is a pattern log and notes section! It also has room to add a fabric swatch if I want! Good work Megan!


Well I have enough to keep me out of trouble for a while!


Cheerio then!

Jessica